Introducing Hoodie
We love building web apps.
The possibilities modern browsers give us to turn ideas into working projects are just plain amazing. We get to play with new capabilities on a weekly basis accross so many platforms.
On top of that, there are a plethora of tools, libraries and frameworks supporting everyone's preferred programming models. The majority of this software is high quality and open source.
The dark side of this bright world is that for every moderately sophisticated application we need to worry about a backend service somewhere. That means system administration, server provisioning, cluster configuration. All doable, but a pain in the neck. We want to build apps.
Wouldn’t it be great if we could just focus on the frontend, 100%?
What if we could
And can this all be easy to set up and be as simple as using jQuery?
It can be.
Meet Hoodie.
Instead of spending a lot of time describing, we’ll just show you Hoodie.
You can follow along with this live demo (skip to minute 4:00):
To show you just how little up front work you need to do to get your app running, we’re going to take a static html page with no behaviour in it and bring it to life with no more than the browser console. All we're using is jQuery and the hoodie.js libraries.
Let’s start by initialising hoodie:
var hoodie = new Hoodie('http://api.appjs.dev');We’ll explain where the domain comes from later.
As a first step: let’s add functionality to the signup form. There’s a form called “signUp” with a couple of text fields and a submit button. Let’s make a click handler and collect all the data from the form.
Then let’s sign up the user, wait for a response, and then update the view a bit.
$('.signUp .submit').click(function(event){
    event.preventDefault();
    var username = $('.signUp .username').val();
    var password = $('.signUp .password').val();
    hoodie.account.signUp(username, password).done(function(){
        $('.welcome').text('Hello, ' + hoodie.account.username);
    });
});
And… that’s it. User signed up for your app. Hard to imagine how this could possibly get any shorter. signOut(), signIn(), resetPassword() work all in the same simple way. Behind the scenes, Hoodie takes care of account creation, email validation and all the boring backend tasks you have to think of.
So now that we have a user, who is also automatically signed in now, let’s bring the task list to life. There’s a form for a new task, and an “add” button. Similar deal. Click handler, get form data, send data. Hoodie needs to know the object type (task), and then you can just give it some JSON. It doesn’t care. It’s document-based. No schema, no config.
$('.addTask .submit').click(function(event){
    event.preventDefault();
    var desc = $('.addTask .desc').val();
    hoodie.store.add('task', {desc: desc});
});
But this only stores data, it doesn’t update the view. Since Hoodie stores everything locally first, we can couple the view update to the actual changes in the data store, not the user input, which makes a lot of sense. Plus, we don’t have to wait for the remote server response and block the UI or anything like that. For this, Hoodie triggers change events you can subscribe to. Let’s do that:
hoodie.store.on('add:task', function(task) {
  $('.taskList').append('<li>' + task.desc + '</li>');
});
A bit anticlimactic, really. It listens for an add event concerning objects of type task. The object is sent along with the event, and we just add it to the list. The form works, bam, there’s a task. And another one.
So what if we wanted to pre-populate the list when a logged-in user returns? Easy, I’ll show you:
hoodie.store.findAll('task').done(function(tasks){
  $('.taskList').empty()
  tasks.forEach( function( task ){
    $('.taskList').append('<li>' + task.desc + '</li>');
  });
});
Enter. List updates. Reload: hey look, your data. Let’s change something in the database to prove that it works.
You could also just have written a few lines to re-build the list whenever a task changes, but we just subscribed to the “add” event previously, so that didn’t update automatically there. But you get the idea.
Let’s mail it to someone.
var list = hoodie.store.findAll('task').done(function(tasks) {
  var to = $('.shareList .mail').val();
  var body = "Hey there! \nHere are your tasks:";
  body += tasks.join("\n");
  hoodie.email.send({
    to: to,
    subject: 'Your Tasks',
    body: body
  });
});
Wait what? Yeah ;)
Behind the Magic
Let’s see how Hoodie works behind the scenes.
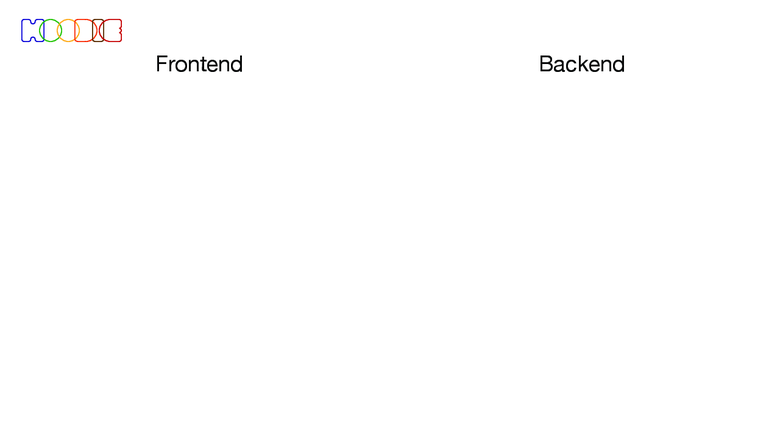
We start with this nice diagram that splits things up between the frontend and the backend. Let’s focus on the frontend first.
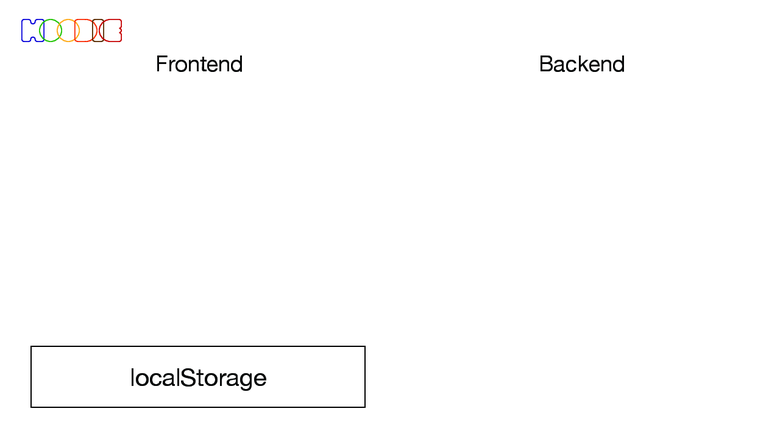
Hoodie is based around localStorage. localStorage is a lightweight, client-side database that is part of most available browsers, including mobile browsers.
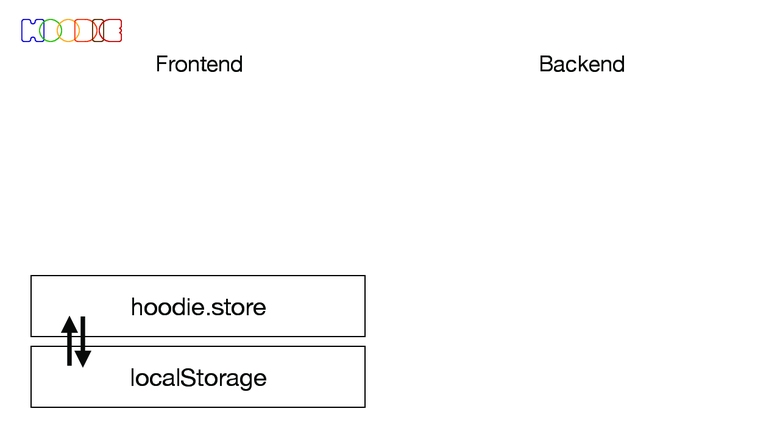
On top of localStorage sits a thin layer we call hoodie.store. It reads and writes data from and to localStorage.
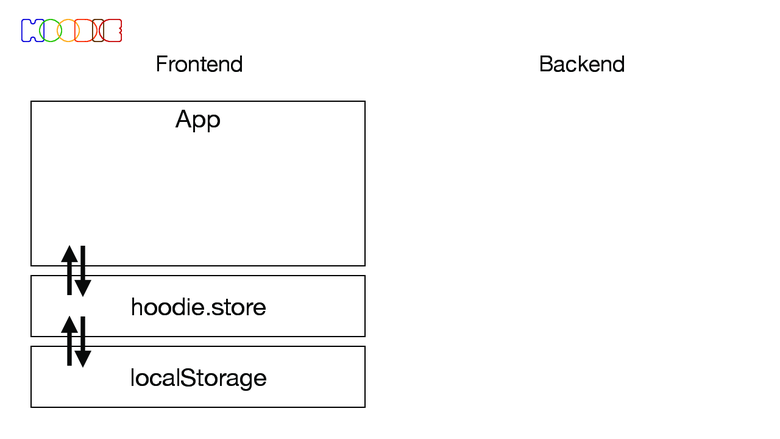
On top of hoodie.store sits your web application frontend code. Hoodie doesn’t care what tools and technologies you use to build your application. It only gives you a few lower-level interface points for your application to hook into. Hoodie can work with plain JS, jQuery, Backbone, Ember, you name it.
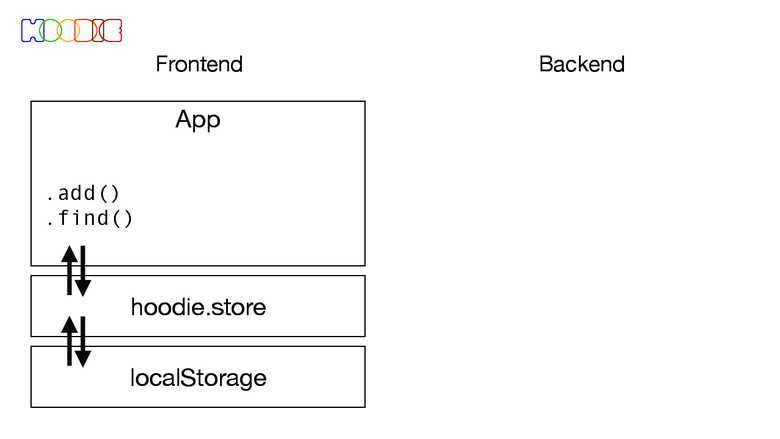
hoodie.store defines a number of methods for you to interact with the data in it. You’ve seen a few of those earlier. Some are for reading data from hoodie.store, some are for writing.
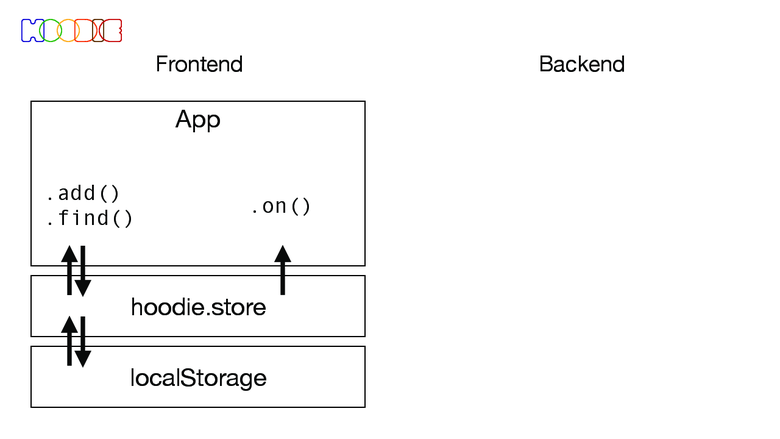
hoodie.store also allows you to subscribe to events. An event can be a number of things, for example, whether a particular object, or an object of a specific type were added to the store. It uses the familiar .on() event registration method that you’ve seen in jQuery, Node.js or elsewhere.
Together, the storage access and event notification methods allow you to build a nice, clean and decoupled interface code. You can update your HTML whenever the data changes in the store and your event handler gets called by Hoodie. You don’t have to entangle your data storage layer with view update code. We think this is really neat (although hardly a new idea).
This is nearly all the frontend side of Hoodie’s core. The nice thing is, once this is all shipped to the client, you can start building apps, no server (aside from a static file server) required. Of course, data is only stored locally to a user’s browser, but for simple apps this is already useful.
The really cool bit though is to combine this with a backend in a Hoodie-specific magical way.
Before we get to explain the magic, we’d like to point out that even though at this point, the setup is very limited, it is the default way of doing things in Hoodie. Even when we learn about how Hoodie interacts with the backend, you never have to do that yourself. You always talk to hoodie.store (and other hoodie.* modules).
Let’s walk through creating one of the task items from earlier:
- The application calls the
.add()method onhoodie.store. hoodie.storehands the data over to localStorage.hoodie.storenotifies any event handlers that previously registered with.on().
Easy.
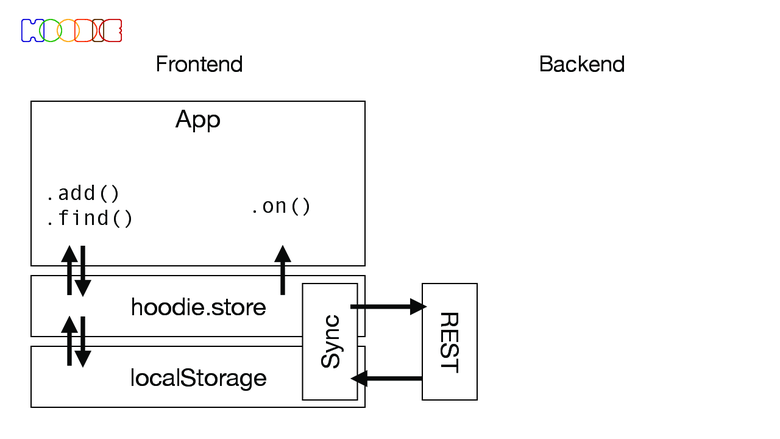
Also on top of localStorage and hoodie.store sits the heart of Hoodie: a data synchronization engine that takes content from localStorage and synchronizes it with a REST backend. We call it “Thomas, the little Sync Engine”. It uses the same .on() event system that hoodie.store offers to your application to know when to sync new data to the server. The synchronization happens asynchronously, without your app ever noticing.
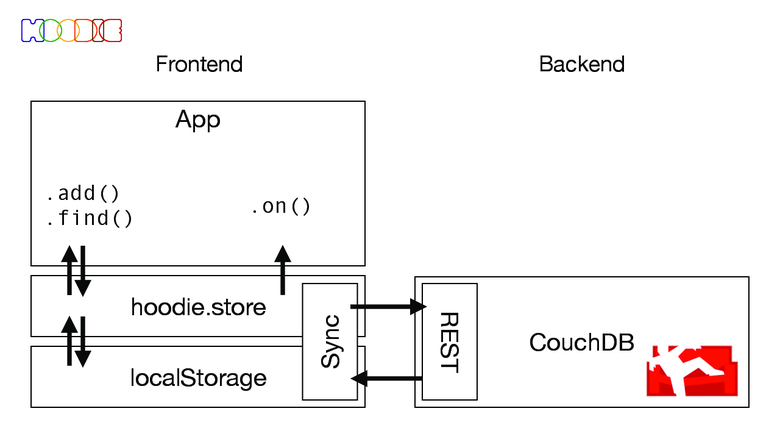
Our implementation of the backend is a CouchDB server. We use CouchDB for several reasons:
- It is a rock solid database that takes data safety and security seriously.
- It has Sync built in! — We don’t have to deal with inventing a new synchronization mechanism, when we can use a tried and trusted one that way smarter people than ourselves maintain and improve.
- CouchDB is a document database, so we don’t have to worry about setting up database schemas or anything. We can just start storing JSON objects.
- CouchDB has an HTTP API. Makes things so easy for us.
- Finally, one of the Hoodie developers is also a CouchDB developer and if ever the need arises that we need anything from CouchDB, we have a direct line to the development team. In fact, the upcoming CORS feature for CouchDB was heavily influenced by Hoodie’s development. And there are a few more features on the way already. Hooray for a healthy project ecosystem.
Now let’s keep walking through the example from before. Remember:
- The application calls the
.add()method onhoodie.store. hoodie.storehands the data over to localStorage.hoodie.storenotifies any event handlers that previously registered with.on().hoodie.storenotifies the sync engine to move our data to the REST API.- CouchDB writes the data to the user’s database.
We continue (assuming a logged in user):
Modules
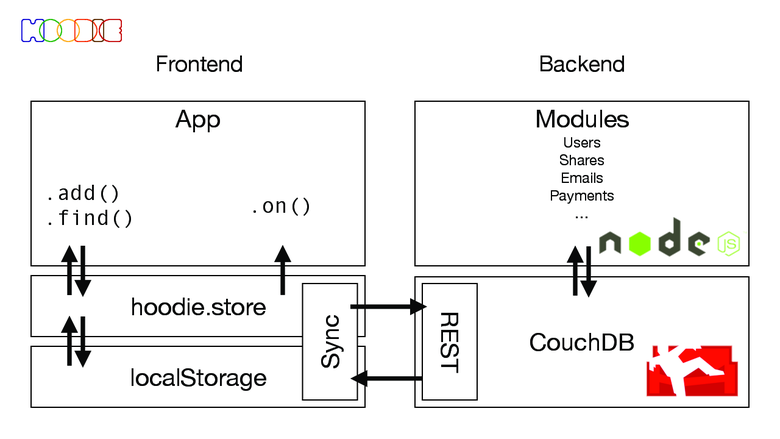
The final piece of the Hoodie puzzle are modules. Modules are where the last bit of the magic happens. Modules also connect to CouchDB and use CouchDB’s so called “_changes feed” to listen for notifications about activity in specific databases inside CouchDB. Think of it as an .on() method for data events inside CouchDB.
Modules are written in Node.js because Node.js fits the Hoodie ecosystem so well:
- Full Stack JavaScript: No thinking in different languages any more.
- All data is always JSON, no conversions, no mapping.
- NPM, the Node Package Manager, makes our life building and your life developing with Hoodie really easy.
Now lets take the example of sending that task list via email. To recap application calls:
var list = hoodie.store.findAll('task').done(function(tasks) {
  var to = $('.shareList .mail').val();
  var body = "Hey there! \nHere are your tasks:";
  body += tasks.join("\n");
  hoodie.email.send({
    to: to,
    subject: 'Your Tasks',
    body: body
  });
});
Internally, Hoodie takes that JSON object and adds a bit of meta data. Most importantly for our purposes, it adds a type: "$email" field. That way Hoodie knows we intend to send an email. Now the normal flow of data commences. The objects goes through hoodie.store into localStorage and from there via the sync engine to CouchDB.
There, the “email worker” as part of the email module is listening on our current user’s database for objects of the type "email". CouchDB, on arrival of our object, dutifully notifies the worker about its arrival. The worker then reads the object, constructs an actual email and sends it over SMTP towards the final destination. The worker then takes the SMTP result (ideally a confirmation that the email was successfully sent) and adds that to the object in a new field called "state" and writes it back to CouchDB.
There the sync engine gets notified of the change the worker made and it goes to sync the object from the REST API into localStorage. From there hoodie.store notifies our application about the change and we can display a success message.
Note that all of this happens asynchronously, so the user will never have to wait for all this to happen. They can interact with your app as usual right after hitting the “Send” button. In case of an error, the app can notify the user about that, when that error state got synced back to the frontend side.
Now we’ve walked through the whole Hoodie stack. All other features of Hoodie are built after the same principle: the frontend, your app, creates new objects that the sync engine syncs to the server, where workers can pick them up, if they represent an action. Results of actions are synced back to the frontend.
Also, all future features of Hoodie use this as well. Writing new modules only requires a minimal amount of JavaScript for the frontend and optionally a worker on the backend. Adding your own features to Hoodie is really easy. Modules are managed as NPM modules, so when you build something useful, you can share it with the world easily, if you want (and you should! :)
Installing Hoodie
We put extra emphasis to make the Hoodie first run experience especially nice. We focus on Mac OS X here, but we already have contributions to bring it to Linux. Windows is not supported at the moment, but all of that only affects the installation routines. Hoodie’s architecture is generally platform agnostic.
To get started we use install Hoodie via Homebrew:
(If you don’t have them already, install Node.js and CouchDB: brew update; brew install node couchdb.)
$ brew tap hoodiehq/homebrew-hoodie
$ brew install hoodie
This gives us a new command line utility, conveniently called hoodie. We’ll use it to create a new application:
$ hoodie new myappcreates an application of the name myapp. This takes a few seconds, depending on your internet connection. The hoodie new command clones an example application from GitHub and installs all the required dependencies via NPM. If you are not used to NPM, don’t worry about the long list of dependencies, other systems tend to hide that from you :)
$ cd myapp
$ hoodie start
starts our application. You’ll see some debug output, but after a second or two, Hoodie should open your default browser and display your new app. With a few commands only you get the full Hoodie application setup, including CouchDB, workers a file server and everything working on your system.
Finally, in order to be able to publish your app to a live website, we support easy publishing to Nodejitsu.
Get started at https://github.com/hoodiehq/my-first-hoodie.
You can also just install Hoodie on your own servers, if you so fancy.
The Design of Hoodie
Now, we’d like to share a few of the design decisions that guided us throughout the development of Hoodie.
Our target audience are user experience designers that picked up a bit of jQuery on the side. We want Hoodie to empower them to build compelling applications without the need for a backend programmer.
On the way to that target audience we also made Hoodie a great tool for frontend web developers. While they probably know enough to set up a backend they need, they’d rather not, (in fact, we’d rather not) and just focus on building great apps and provide a good user experience.
One of our design techniques for Hoodie is something we call Dreamcode, or if you are into acronyms “Dreamcode Driven Development (DDD)”. Dreamcode doesn’t actually need to be source code, it can be the user experience as well, for example, how it is to install Hoodie.
Dreamcode always starts with the question “Wouldn’t it be cool, if…”, this can be a frontend API, a backend functionality, anything really that gets us excited to brainstorm. Then we discuss whatever is at hand as a group and usually what started as an intriguing idea develops into something that is really compelling, like “wouldn’t it be nice if Hoodie could send and receive emails from and to the browser?” and eventually, we get so excited about the particular shape of a particular feature that we can’t help but to find a technical solution for it.
Dreamcode: if an idea gets us excited, we’ll implement it.
Dreamcode goes hand in hand with another aspect of our design philosophy. Hoodie aims to delight. Hoodie should be fun to use, lightweight and not in the way of you developing your best application. We care about a nice setup procedure, we care about nice APIs (the hoodie.store API for example went through over forty iterations and we still want to make it better).
Hoodie should be easy to set up, easy to program with and easy to deploy to your servers or the cloud and you shouldn’t have to worry about operations, if you choose not to. Hoodie wants to enable your 100% focus on the frontend.
We also are strong believers in the “Make it work, then make it fast, then make it pretty” mantra. We currently consider Hoodie a sketch of on a idea, a pencil drawing that communicates the idea of lightweight frontend application development. We wrote all the code that supports showing off that idea, but we restrained ourselves from making it fast, and pretty for now.
Similarly, we don’t try to solve problems that don’t arise while we try to communicate the idea of Hoodie. We are aware of some limitations of Hoodie and we will be working towards resolving them, but generally, we follow “It is a problem when it is a problem” to make sure we don’t get stuck in fixing some theoretical issue.
License
All of Hoodie is available as Open Source Software under the Apache 2.0 License. All code is on GitHub, fork away: https://github.com/hoodiehq.
Open Source FTW!
State
At the point of writing this (early March 2013) Hoodie is considered a Developer Preview. That means that the foundation of Hoodie stands, a few features exist and we are inviting you to check it out and build applications with it. We do not recommend using Hoodie for production deployments just yet, but we are working hard on finishing off the last bits.
Hoodie’s roots lie in an application called “minutes.io” (http://minutes.io) and like Rails got extracted from Basecamp, Hoodie was extracted from minutes. We are in the process of porting minutes back to Hoodie proper and finish the remaining pieces for minutes to go into production in the next couple of weeks.
If you want to build apps or want to help out with Hoodie, please get in touch!
Fin
We are mighty excited about Hoodie and we hope you are too!
If you have any questions, please get in touch:
Alex, Gregor & Jan
@espylaub,
@gr2m &
@janl
Website: http://hood.ie
GitHub: https://github.com/hoodiehq
Twitter: https://twitter.com/hoodiehq
PS: Despite the fact that Hoodie is not 100% ready yet, we have a few people looking into developing commerical apps with it. We gladly help along the way, if you need any Hoodie training, support or consulting, please get in touch at team@thehoodiefirm.com.